If you read my previous post about CMK08, you have some sense of the format of the gathering. If you haven’t read it, go back and do that first, or this might not make much sense.
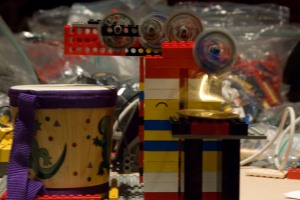
Not only did Gary Stager want us to work on a project at CMK08, he wanted us to work in groups. I volunteered to head up a lego/logo group, and by that I meant I was willing to stand in a space in the room and have others come over. I knew nothing about logo – and my lego history was based mostly on my brother’s large collection circa 1980. Gears? Motors? Nope. But I had come for logo experience, and I was bound and determined to get some. Thank heavens Jim Gerry wanted to work with these tools too. Jim suggested we make a sculpture that made sound, so that was our intro-project. The inclusion of the word “sculpture” was purely accidental, I’m sure, but it resulted in my insistence that we at least consider some aspect of aesthetic in the final design. “Aesthetic” eventually translated to matching stripes, but hey, at least it had some kind of visual consistency.
This day-one experience was primarily mechanical – how do you get a very fast-turning motor to slow down enough to turn something that hits something else and then bonks into a toy drum? It was all very Rube Goldberg to me. John Stetson was the resident lego guru, and his help was critical to my understanding of gear ratios. Here’s the short version: first use a small gear that turns a large gear. Then put a small gear on the opposite end of the large gear axle, which then turns another big gear. Trust me, it works. Take a close look at the gears in the picture and the video to see what I’m talking about. I also decided that one noise wasn’t enough in our music-machine (music is perhaps an overstatement), and I added the finger-cymbals on the side. This is where I got to put my gear-ratio knowledge into practice after seeing it done on the first part of the contraption.
As we tried out the pieces, we ran into trouble and engaged in debugging. The best way to learn is to have your project not work, or at least not work perfectly, and then try to figure out what went wrong or how to fix it. The embedded reflective step in debugging is one of the key parts in an effective learning process. The first thing we debugged were gear ratios, the second was how to keep the part hitting the drum from bouncing back too high (add a delimiter), and third was how to keep the vibration from tearing apart the structure (re-engineer . . this time with crosspieces and stripes). Last but not least, we opted to add in blinking lights, so we hooked up a light strand to one of the power legos and added that to the logo “brain”. The programming for this project was easy : turn the motor on, and keep running. That pretty much did it for the first session of project work. I think both Jim and I felt some sense of accomplishment, meeting our initial goal for the project inside the 3 hour time-slot we’d been given. I know I also felt a little deflated, since I still couldn’t see what making this project had to do with me learning lots about logo. Fun? Sure. Useful? I wasn’t yet convinced.
Tuesday brought us back to the lego table. I knew I wanted to use one of the sensors and tackle more sophisticated programming than we’d done the day before.
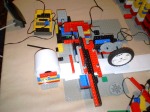
The idea was to create something that would move a pencil back and forth on adding machine paper, which moved continuously, giving a reading of the sensor change over time. After a brief discussion of the issues before us, we decided it would be best (not to mention easiest) to start with the mechanics of the structure and worry about the sensor and programming components later. Why did we pick this? Probably because we had had some success with the mostly-mechanical project the day before. When you are learning new things, you have to attach it to something you know already so it sticks. If you can’t figure out what you know that’s related, just keep boiling it down until you find something that looks familiar. Relative to the day before, gear ratios now looked familiar. Learning from the previous day, we constructed with the vibration factor in mind, tackled the issue of attaching a non-lego part (the pencil) to the lego structure, and ran through about four different gearing structures to make the pencil move back and forth.
Then it was time for the light sensor to provide data, and us to provide programming to make the machine do something. Rather than walk you through the programming experience blow by blow – since it took us until mid-day Thursday to get it fully functional – let me just hit the “learning points”, or the high points in my frustration.
First, we had to figure out how to get the sensor readings to show up on the logo brick, then to show up on the laptop, and finally to be used by the program to make the motor move, with variations in duration and direction depending on the relative light/dark of the sensor reading. The help section of logo is less than direct for those such as myself who don’t fully grasp the various parts of the program nor the fundamental semantics of the programming language. As the squeaky wheel gets the help, I squeaked for a bit and Gary rode in to the rescue with a couple of key bits of information and formatting order of operations. In the interim, however, I had one of those frustrating learning experiences. I knew what I wanted the machine to do, but the person providing answers at that time had in their mind what commands I ‘should’ use. Sparing you the details, I’d run into this kind of situation as a high school student, and this experience was bringing it all back in spades. I did what I did then – I proceeded to do exactly what they were telling me to do, went back and explained why their solution didn’t do what I needed, then sat down to figure out how I could make it do what I DID want it to do. Harumph. The upshot of this experience is that I will try to be more conscious of listening to my students when they try to tell me what they are trying to accomplish instead of assuming I know what they need and want to do. Reconnecting with that frustration was uncomfortable from a learner perspective, but definitely eye-opening when I put my teacher hat back on.
Jim and I finally sat down to figure out the programing issues. This was the best two-heads-are-better-than-one working experience I’ve had in a long time. We opted to write the code as if we knew what the code was – basically making up terms and functions – and once we had it straight in our heads we’d figure out how to translate it to logo. We went back and forth about variables, parameters, how to keep differences as positive numbers (or not), what to divide by to make the numbers work, and a few other odds and ends. Surprise, it worked out great! Turns out the “If else” and “If and” statements were the key, as well as setting some global variables (this is where we got to use our made up vocabulary as part of the working code). Once the pen (pencil didn’t make a dark enough mark) moved according to the sensor input in the right direction, for the right duration, and changing direction appropriately, Jim got the paper going and we had it made. Triumph!
What did I learn from CMK08? On a test, I could do a (very) little logo programming, explain gear ratios, draw a map to the Puritan Back Room, and describe what Frozen Pudding ice cream tastes like. In a more significant sense, I learned that working longer on one project can be more valuable than a survey, that thinking hard about something is rewarding even if the results don’t change the world, and that many people are still not comfortable with acting outside of proscribed lines. I’ll be more open to fewer, more difficult, time consuming projects with my students. I resist the temptation to solidify my syllabus before I meet the learners in my class. I’ll be more careful with the scaffolding I give learners when they are approaching something new, but still let them discover parts of it for themselves. I’ll be running over the experience and my notes for months to come, reflecting on my teaching in light of the ideas presented at CMK08, and tweaking it along the way.


